About
When to create a subsite:
- This site has a different function from the main site
- This site has a different target audience from the main site
- The site has information which is not needed elsewhere
- When you have separate list or document libraries that are specific to a site.
Only a Site Owner can create and set permissions for a subsite. However, when you designate an Owner in that subsite, they are then able to take on managing app creation and setting permissions for that subsite.
Creating a Subsite
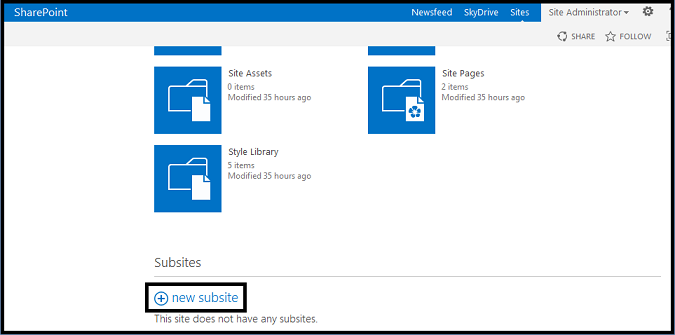
- On your parent site, enter the Site Contents area.
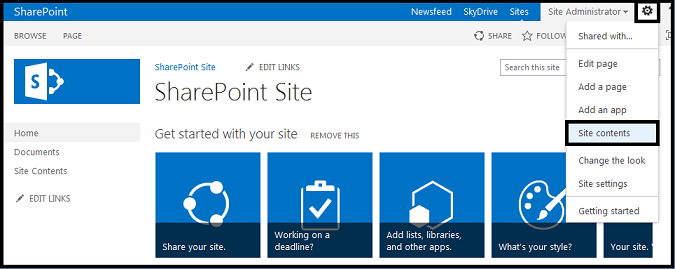
- Scroll to the bottom of the page, and find the +new subsite option.
-
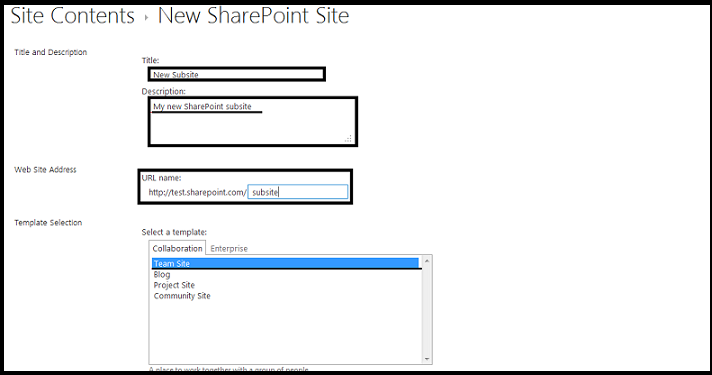
Title your subsite, and if you like add a description.
- Generate a URL for your site, by tying the Title for your subsite, using underscores instead of spaces, and no special characters like "!@#$%^&*().
- Choose your Site Template. The default and preferred type is a Team Site. Your unique Site Templates are saved under the Custom heading.
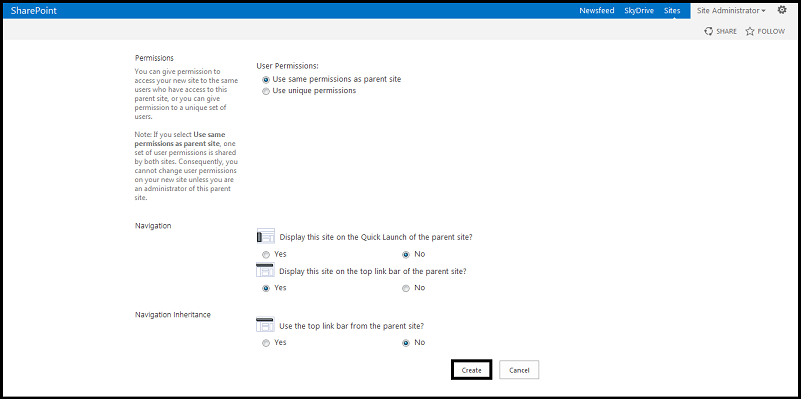
- Set the Permissions. If you like, you can Use same permissions as parent site which will retain all groups and permissions levels you have set on the parent site. Use unique permissions will allow you to create unique Visitor, Member and Owner Groups for this particular site, and break all other permissions. To continue with this, refer to Setting Unique Permissions for a Subsite
- In Navigation Inheritance, choose Yes to include a Quick Link back to the Parent Site.
- Click Create. A new site may take up to 3 to 5 minutes to generate.
Once the site is generated, begin to build the site by Adding Apps and Editing Pages as you like.
Setting Unique Permissions for a Subsite
To set completely unique permissions structures, choose the option to Use Unique Permissions in Step 6 when Creating a Subsite.
- Once you click Create in Step 8 above, you will be prompted to Set Up Groups for this Site.
- First, add the Visitors for this Site. You can Create a new group, by adding individual names to the Text box below the Visitors Group name. If you choose to Use an existing group, you will be able to choose a Group from your parent site from a drop-down menu.
- Next, add the Members for this Site. Again, you can Create a new Group, or Use an Existing Group.
- Finally, add the Owners of this Site. If you will not be the site Owner, you can remove yourself and add the appropriate Owners. If you do so, you will be unable to make any Owner level changes to the site once you enter it.
- Choose OK.
Your new Subsite will be generated. Begin to build the Site by Adding Apps and Editing Pages.
Change the Look of a Subsite
Please keep in mind that black text on a white screen or vice versa is recommended for the most AODA compliant Sites.
- Go to the Site Settings.
- Choose Change the Look.
- Choose from the standard packages. For accessibility considerations, avoid packages with busy background images.
- Customize the standard packages. You can customize by Adding Images, choosing Colours and selecting Fonts. For accessibility considerations, choose a font set without serifs (Segoe UI Light or Century Gothic meet these criteria.)
- Please do not change the Site Layout. Seattle is the default, and choosing a different layout will be confusing to your Site Visitors and Members.
- Once you have chosen a look, Try it out to see how your site will appear to your Visitors and Members.
Choose either No, not quite there to continue revising the look of your site, or Yes, keep it to accept the changes and Add Apps and Edit Pages within your Site.
Add Apps and Edit Pages
A Subsite comes by default with a OneNote Notebook, Newsfeed, and Document Library, ready to go. However, you may want to build different Document Libraries or Apps and customize your pages, to suit the need of your team.
Add New Apps
- Enter the Site Contents area.
- Choose the add an app option.
- Find new apps in one of several ways. Search for the name of your app, or scroll down through the list, and navigate through the pages of apps. There are at least two pages of unique apps.
- Click the icon for the app to add it.
- Name the app, and click Create.
- You will be automatically returned to the Site Contents area, and your app will appear with a green new! icon below the name.
- Click the app's icon to customize and add content or information to your app.
Your app will be ready to present on your Site's pages.
Edit Pages to Show Your App
For now, your new app rests only in the Site Contents area of your site. To add it to a specific page, start by going to that page. For example, to add an app to your Home page, start by going to your Site's Home page.
- Edit your page. You can do this by either clicking the Edit option in the Quick Actions Menu, or by opening the Page Ribbon and selecting Edit.
- Select any unwanted apps, and press Backspace or Delete to remove them. This does not delete the app, just removes it from this page.
- Click your cursor in the area you would like to add your app.
- Choose the Insert Ribbon.
- Choose App Part.
- Choose the App you would like to add by clicking on it, then choose Add.
The app will appear on the page. If it is in the wrong location, click on the app and drag it to your preferred location. Repeat these steps until your site is built as you prefer.
Saving your Subsite as a Template
Once you have built a new Subsite, you may prefer to save it as a template for future repurposing.
- Go to the Site Settings.
- Under Site Actions, choose Save Site as Template.
- Name the template. The File Name and Template Name can be the same but should be unique within your Site Collection.
- If you would like to take Document Libraries, Lists and other Apps you have built onto the Site, choose Include Content.
- Click OK.
The Site Template will now be available when you create a +new subsite.
Need Help?
Contact the IT Service Desk, or call 519-748-5220 ext. 3444