For Everyone
- Printing at Conestoga: Common Questions
-
Printing Guidelines (PDF Download)
-
Printing Rates
-
How to Check your Print Balance
-
How to Increase your Print Balance
-
How to Add Mobility Printer
- How to print on MacOS
- Printer Locations
For Employee Department Printers
-
How to Add a Printer
- How to Print in Colour and Single Sided
- Ordering Toner Cartridges for Office Use
Printing Guidelines
Listed below are several guidelines for printing on campus. These guidelines are also posted next to lab printers. The full Guidelines document can be viewed here:
Print_Guidelines_August2024.PDF
- All printing must be school-related.
- All Conestoga College students start with 40 non-refundable print credits.
- This Print Balance renews at the beginning of every term.
- Maximum print job size is 100 print pages (100 pages single-sided prints, 50 pages double-sided prints)
- The maximum number of copies per print job is 4.
- All printers will default to double sided duplex, black/white/grayscale
- Where possible, practice paper conservation:
- Use double-sided printing
- Print multiple pages on a single sheet
All print jobs are recorded. Conestoga College reserves the right to restrict a user's printing if inappropriate printing is occurring.
Large print jobs - Please see
Conestoga Printing Services for information.
Printing Rates/Copying
Listed below are paper sizes and the charges for printing/copying.
| Size | Color | Grayscale | Colour Duplex | Grayscale Duplex |
| Letter | $0.15 | $0.05 | $0.10 (each side) | $0.04 (each side) |
| Legal | $0.15 | $0.05 | $0.10 (each side) | $0.04 (each side) |
| Ledger (11x17) | $0.25 | $0.10 | $0.20 (each side) | $0.08 (each side) |
| Default (Other Sizes) | $0.25 | $0.10 | $0.20 (each side) | $0.08 (each side) |
| Plots | $1.00/sq. meter | | | |
How to Check Your Print Balance
Please complete the following steps to check your current
Print Balance
- Go to the
Conestoga College Print Portal (only available on campus or with a VPN connection).
- Log in using your Conestoga Email and
Password.
- Your
Balance will be displayed on the main page.
Use Mobility Print on your Windows Laptop
If you would like to use Mobility Print please follow the steps below. Click here if you would like instructions to print on MacOS.
- Go to http://papercut01.conestogac.on.ca:9163/setup and follow the instructions on the screen.
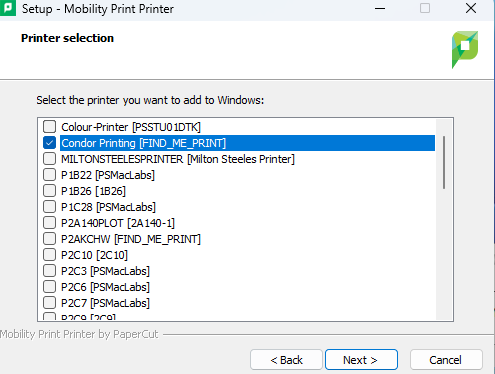
- Download the Mobility Print Printer Setup file
- Select Condor Printing [FIND_ME_PRINT]:
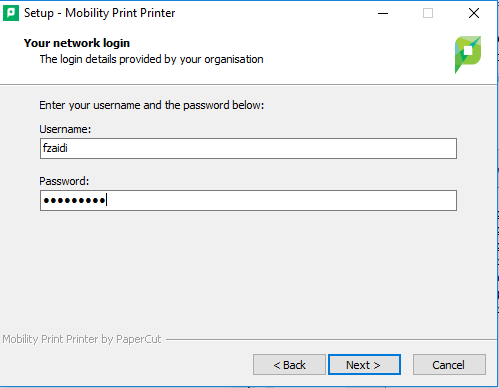
4. Continue with the setup process by pressing next and when prompted login with your
CONDOR ID and password.
5. This will install the software on your device.
To use the scan to email and copying functions, please tap your ONE Card or login to the copier with your Conestoga username and password and follow the instructions on the touch screen of the copier.
How to Increase your Print Credits
Once your Non-Refundable Print Credits reach ZERO – print charges will start deducting from your CONDOR CASH (ONECARD) account.
To continue printing, add funds to your ONECARD
Employee Department Printers
How to connect to Condor Printing
Note: Printers can only be added on campus. Printers cannot be added or accessed while connected to the VPN.
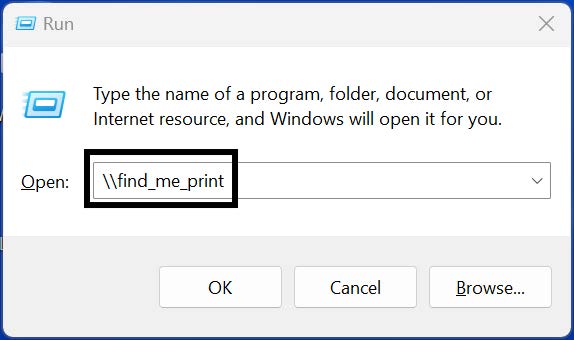
Step 1: Press
Windows Key + R to open the Run window.
Step 2: Type in
\\find_me_print and click
OK.
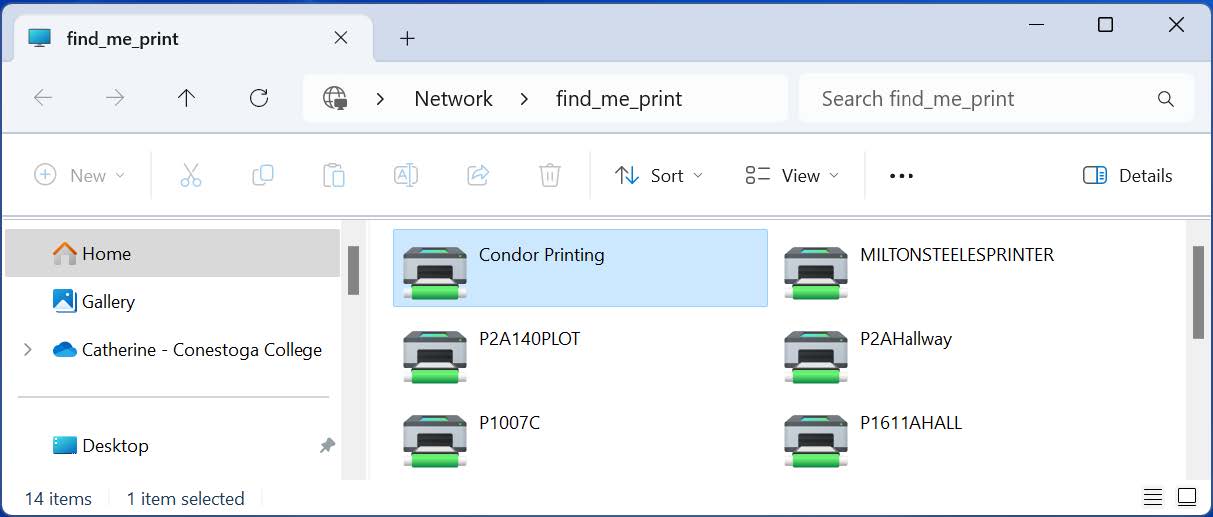
The list of all available printers should appear within the
File Explorer window.
Step 3: Double-click the
Condor Printing printer name to install and add to your laptop/computer.
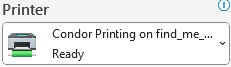
When printing, ensure you have the following “Condor Printing on find_me_print” selected under the Print settings.
Connecting to a Plotter
Step 1: Determine your Print Server based on your location:
| Location | Print Server |
Plotter Name |
|---|---|---|
| Doon | \\find_me_print | P2A140PLOT PW10PLOT |
| Cambridge - Fountain | \\PSSTU01DS | PCA2126Plot PCA2128Plot1 PCA2128Plot2 PCA3122Plot PCA2132Plot PCA3207Plot1 PCA3207Plot2 |
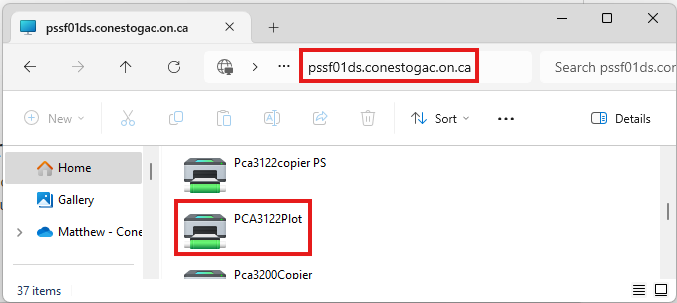
Step 2: Open the printers list window
Press the Windows Key + R to open the Run Window. Type in two backslashes \\ followed by the name of the print server for your location. Click OK.
Step 3: Authenticate with your Conestoga username/password if asked. Find the plotter you would like to connect to in the window that pops up and double-click the printer. Windows should automatically find, install the driver, and add the plotter to your laptop/computer. The plotter will be named after the room it is in, prefixed with the letter P. Also, the name is usually on a label affixed to the front of the device.
How to Print in Colour and Single Sided
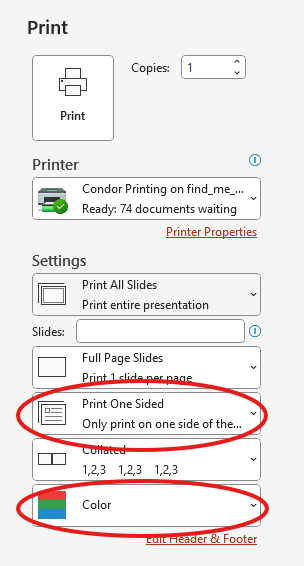
To print in colour or single sided, select the appropriate settings in the application and print as usual. This example shows the settings in the PowerPoint print dialog:
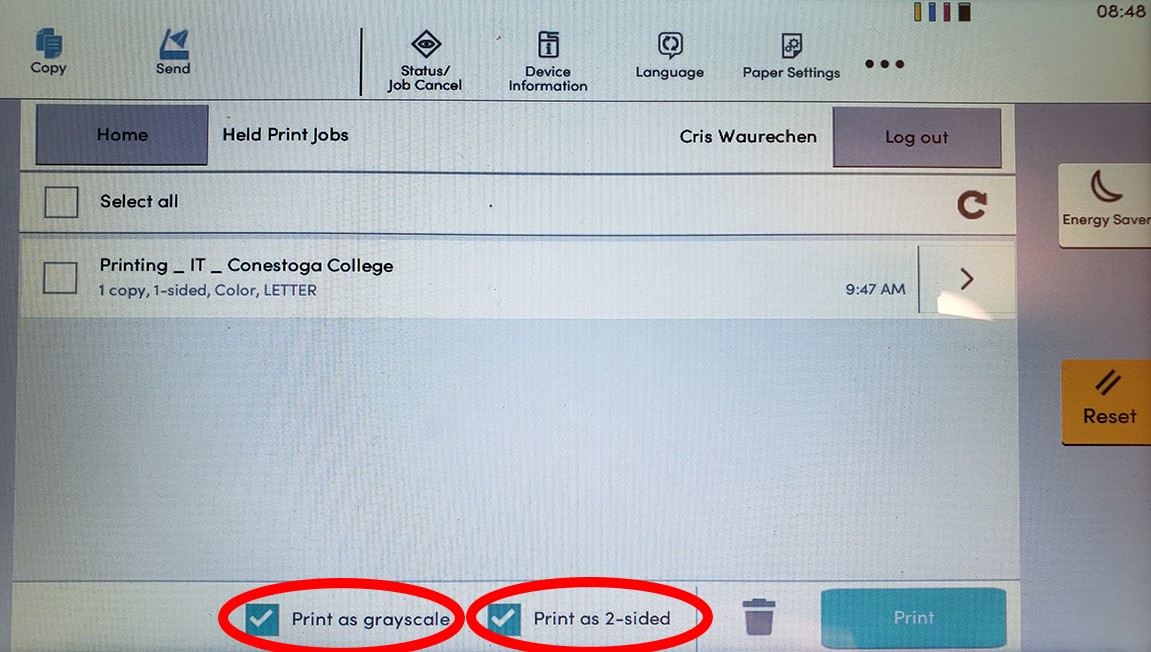
When you arrive at the printer, tap your card and view your print jobs for release. Before pressing the Print button, in order to print in colour uncheck the Print as grayscale option, and to print single-sided uncheck the Print as 2-sided option.
Ordering Toner Cartridges for Office Use
To order a toner cartridge for office use, please send the request to
IT Services with the Printer Model and/or Toner/Ink Cartridge Number. Include the colour ink/toner if the request is for a colour printer. The cartridge(s) will be delivered via Shipping and Receiving.
Printer Locations
Brantford
*Restricted Access printers are in physical locations only accessible by specific employee groups
Area Location Details Restricted Access* Colour 11x17 Scanning Wellington Cafeteria, Lower Level N N Y Y Wellington Security, Ground Floor Y N N Y Wellington Faculty Lounge, 3rd Floor Y N N Y Cambridge Fountain St.
*Restricted Access printers are in physical locations only accessible by specific employee groups
Area Location Details Restricted Access* Colour 11x17 Scanning 1st Floor 1st Floor Outside A1310 N N Y Y 1st Floor Room A1109-8 N N Y Y 1st Floor A1109-8 LRC Print Room N Y Y Y 1st Floor A1608 Receiving, 1st Floor Y N N Y 1st Floor A1213-9 Y N N Y 1st Floor Security Reception Y Y N Y 2nd Floor Hall Outside A2138 N N Y Y 2nd Floor A2126 N N Y Y 2nd Floor A2205-2 Y Y Y Y 3rd Floor A3122 N Y N Y 3rd Floor Hall Outside A3100 N N Y Y 3rd Floor Hall Alcove between A3136 and A3130 N N Y Y 3rd Floor A3231 Y Y Y Y Skilled Trades Campus (Reuter Dr.)
*Restricted Access printers are in physical locations only accessible by specific employee groups
Area Location Details Restricted Access* Colour 11x17 Scanning 1st Floor Corridor 1061, Outside Room 1055 N N N Y 1st Floor Hall Outside 1099 N N Y Y 1st Floor Room 1007 N N Y Y 1st Floor Room 1007 N Y Y Y 2nd Floor Outside Computer Labs 2065 & 2067 N N N Y 2nd Floor Hall Outside 2086 N N Y Y 2nd Floor Room 2078 N N N N 2nd Floor Room 2015 Y N N Y 2nd Floor Room 2002 Y N Y Y Guelph
*Restricted Access printers are in physical locations only accessible by specific employee groups
Area Location Details Restricted Access* Colour 11x17 Scanning A Wing In Hall in front of A11 N N N Y A Wing 155 WLI Staff / Faculty Area Y Y Y Y C Wing C7 Cafeteria N Y Y Y D Wing D4 Student Lounge N N Y Y D Wing D17 Receiving Y N N Y E Wing In Hall in front of E12 N N Y Y E Wing E7-1, Automotive Faculty Y Y N Y Kitchener Doon
*Restricted Access printers are in physical locations only accessible by specific employee groups
Area Location Details Restricted Access* Colour 11x17 Scanning ATS Renovation Hallway near Admin Office N N Y Y ATS Renovation Room 100 Y N Y Y Dutton Powerhouse DPH Y N N N ECE Room 30/31 - Reception Y N N Y ECE Room 460 Y Y N Y Rec Center Wellness Centre Reception Y N N Y Rec Center Rec. Ctr. Admin Office Y Y N Y Rec Center 122 Activity Room Entry Y N N N Toya. Power Eng. Center RM-2 Y Y N Y TSB Building Retail Lab Y N N N Welcome Center (WC) Copier at Entrance N N N Y Welcome Center (WC) Registrar's Office Copy Room Y N N Y Welcome Center (WC) Copy / Print Area, back of Registrar’s Office Y N N Y Welcome Center (WC) 102-2 Staff / Counselling Area Y N N Y Welcome Center (WC) 2nd Floor Room 200, International Y N N Y Welcome Center (WC) Room 101 - Service Counter Y Y N Y Welcome Center (WC) 2nd Floor Room 235 or Corridor Outside 235 Y N Y Y Welcome Center (WC) 2nd Floor, Outside Room 272 Y Y Y Y A Wing Room 2A501 N N Y Y A Wing Hall Outside 2A624 N N Y Y A Wing 2A100 Corridor N Y Y Y A Wing 2A503 Computer Lab N N N N A Wing Room 2A213, Across from Book Store N N N N A Wing 2A323 Shipping Y N N Y A Wing 2A215 Bookstore Y N N Y A Wing Room 1A101 Y N N Y A Wing 2A215 Bookstore Y N N Y A Wing 2A322 Y N N Y A Wing 2A601 - Indigenous Student Support Ctr. Y Y N Y A Wing 2A612 Faculty Office Y Y N Y A Wing 2A140-2 Copy Room Y N Y Y A Wing Machine Shop 2A511 Y N Y Y A Wing 2A509-4 Test Centre Office Y N Y Y A Wing 2A106 CSI Office Y Y Y Y B Wing 1st Floor, Open Access PCs between Business Fac. Office & Health Services N N N Y B Wing 4B Print room N N Y Y B Wing 2B5 LRC Print Room N N Y Y B Wing 2B5 LRC Print Room N N Y Y B Wing 2B5 LRC near Open Access PCs N N Y Y B Wing 2B Outside Library at Tech Bar N Y Y Y B Wing Room 2B10-8 Y N N Y B Wing 2B1 LRC Staff Room Y Y N Y B Wing 1B04 Mail Room Y Y Y Y C Wing Outside 1C9 N N N Y C Wing 2C14 Y N N Y E Wing Outside 1E12 at Service Desk N Y N Y E Wing Outside 2E14-1 at Entrance N N Y Y E Wing 2E02, CI Office Y Y N Y E Wing 3E02, Facilities Office Y Y Y Y E Wing 3E315 Secure Corridor Y N N N F Wing 2F21A, Open Area N N N Y F Wing 1F11, Open Area N N N Y F Wing 2F38, Sim Lab Y N N Y Woodworking Center Hallway Open Seating Area N N Y Y Milton
*Restricted Access printers are in physical locations only accessible by specific employee groups
Area Location Details Restricted Access* Colour 11x17 Scanning Centre of Excellence in Healthcare 2110 Student Lounge N N N Y Centre of Excellence in Healthcare 2104 Dispensary Y N N Y Parkhill Student Area, 2nd Floor N N N Y Parkhill Faculty WLI Space Y Y N Y Stratford
*Restricted Access printers are in physical locations only accessible by specific employee groups
Area Location Details Restricted Access* Colour 11x17 Scanning Stratford 1104 Corridor N Y Y Y Stratford 1117 Y N N N Waterloo
*Restricted Access printers are in physical locations only accessible by specific employee groups
Area Location Details Restricted Access* Colour 11x17 Scanning A Wing 1A18 LRC N N Y Y A Wing 1A18 LRC N Y Y Y A Wing Room 1A14 Y N N Y A Wing 1A15 Culinary Receiving Y N N Y A Wing 1A21 Welcome Desk Y N N Y A Wing 2A30 WLI Space Y N N Y B Wing Outside Room 2B21 N N N N C Wing 1C04 Faculty Office Y N N Y C Wing 1C03 Faculty Office Y N Y Y C Wing 1C02 Mail Room Y N Y Y C Wing 2C07 Faculty Office Y Y N Y F Wing Hall Outside 2F06 N N N Y F Wing 1F02 CSI Office Y Y N Y G Wing Room 1G07 N N N N G Wing 3G15 (Corridor) N N N N G Wing 2G17 LINC Office Y Y Y Y G Wing 3G26 WLI Office Y Y Y Y G Wing Room 4G26 Y N N N
Need Help?
Contact the
IT Service Desk, or call 519-748-5220, ext. 3444.