VPN Office Campus Access
When working from home, you may want to access documents stored on your network drives. To connect to your drives, download the Ivanti Secure Access Client for remote desktop.
Note that Pulse Secure has rebranded to Ivanti Secure Access Client, which you may be prompted to update to when connecting to the VPN.
Step 1: Download and install Ivanti Secure Access Client on your device
- Download the Ivanti Secure VPN client for PC & MAC to access the S: drive off-campus.
- Download 64-bit Windows Client | Installation Instructions
- Download MAC Client | Installation Instructions
-
Download Android Client (Chromebook & Mobile) |
Installation Instructions
- Download iOS Client| Installation Instructions
Note: Users of macOS Big Sur facing issues installing the client should review this
support document.
Step 2: Add New VPN Connection
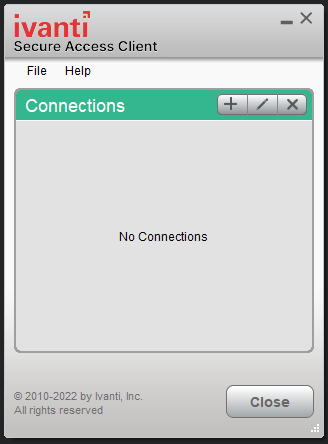
- To add a new connection, click on the
+ sign.

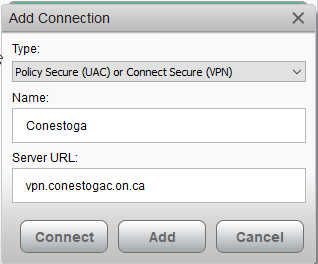
- Select connection type as Policy Secure (UAC) or Connect Secure (VPN) and server URL:
'vpn.conestogac.on.ca'. Select Connect.

Step 3: Connect to VPN
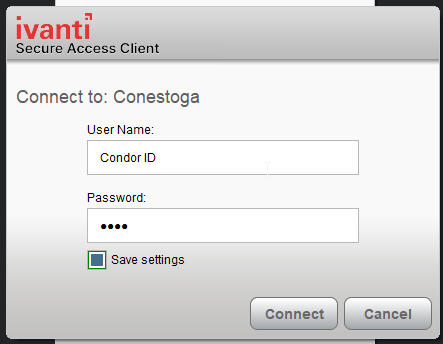
- Once you've clicked on your "Connection" tab, enter your Condor ID and password to create a connection.

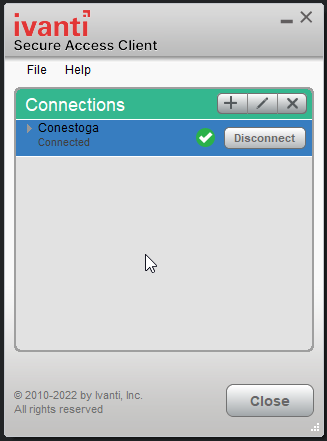
- The VPN shows
Connected.

You are now connected to the VPN and can access the college sites and services.
Updating the VPN
To update the Pulse Secure VPN application, follow the instructions above to download the latest version for your operating system and install the new version. It will keep your existing settings and connections.
If you experience issues updating the VPN Application, please contact the IT Service Desk.
Top 3 uses for VPN
Accessing Network Drives
Once you are connected to Pulse Secure, you can access college network drives such as the S: drive.
You can find instructions for adding network drives to Windows from Microsoft here.
If you are having issues accessing a network drive, please contact the
IT Service Desk.
Accessing SIS
Once you've logged in to Pulse Secure/VPN, you can now access SIS from any web browser.
If you are still having trouble with your SIS access, please check our SIS support page, then contact the IT Service desk via our chat to help troubleshoot.
Using Remote Desktop
- Type "RDP" into the Windows 10 search bar. You will see "Remote Desktop Application" appear.
- Start the Remote Desktop Connection application.
- When prompted for Computer, enter your desktop-name, including the ".conestogac.on.ca"
- Connect
- Enter your Login & Password. If you see an initial warning that your credentials did not work, try once again.
- You should now be logged in, and you should see your normal desktop.
- You are now controlling your office desktop computer remotely.
Need Help?
Contact IT Service Desk or call 519.748.5220, ext. 3444.

