Connect to the Wi-Fi
Select your device or operating system for a walk-through to get connected.
- On your Mobile
- On your Laptop
-
Guest Wi-Fi Access (Eduroam)
- Change Your Password
- How do I create a secure password?
-
Unlock your Account
- Troubleshooting
Before you Start
To get connected, you'll need your Condor ID and password.
What's my Condor ID and password?
On Your Mobile
iPhone
- Enter the
Settings Menu.
- Choose Wi-Fi and select CCSecure from the list of available networks.
- When prompted, enter your Condor ID and password.
- You should be prompted with a Certificate. Click Accept.
- When connected successfully, your Wi-Fi connection will list CCSecure with a checkmark.
You should now be connected to the Wi-Fi at Conestoga.
Android
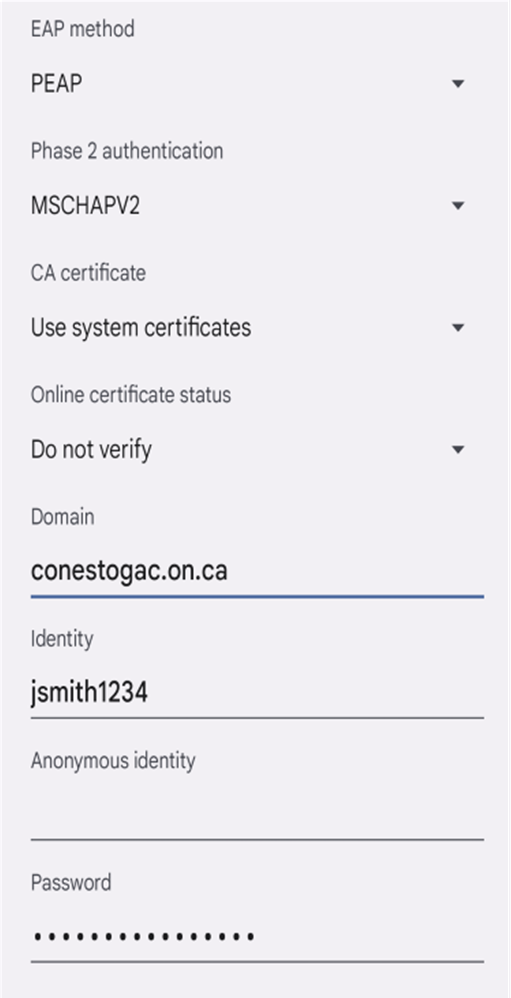
You can follow the screenshot below and/or the written instructions
This guide was made using a Pixel 4a running Android 12.
- Open the Settings Menu.
-
Choose
Wi-Fi. Select
CCSecure from the list of available networks.
-
A sign-in window will open.
EAP Method: "PEAP"
Phase 2 Authentication: "MSCHAPV2"
CA Certificate: "Use System Certificate" OR "Do Not Validate" (no further info is needed)
Domain: conestogac.on.ca -
Note: some newer phones don't list "Phase 2" under the main list, if you don't see "Phase 2" you will need to scroll down to "Advanced" then change the "Phase 2" then tap on "Save". Identity:
will be your Condor ID, Password:
will be your most recent password
-
When connected successfully, your device should list CCSecure as
Connected.

You should now be connected to the Wi-Fi at Conestoga.
On your Laptop
Apple (OSX)
These steps should be very similar for any version of Mac OSX 10.6 (Snow Leopard) and up.
- Select CCSecure from the Wi-Fi menu.
- When prompted, enter your Condor ID and Password.
- When connected successfully, there should be a checkmark next to CCSecure.
You should now be connected to the Wi-Fi at Conestoga.
Windows 10
- Click on the Wi-Fi icon in the System Tray (bottom right).
- Choose CCSecure from the list and click Connect.
- When prompted, enter your Condor ID and password.
- When prompted with the security warning below, choose Connect.
You should now be connected to the Wi-Fi at Conestoga.
Linux
- Click on the Wi-Fi icon in the top right.
- Choose CCSecure from the list and click Connect.
- When prompted, enter your Condor ID and password.
- Ensure that the Authentication is set to Protected EAP (PEAP) and inner authentication is set to MSCHAPv2.
- When prompted with a security warning, choose Ignore.
You should now be connected to the Wi-Fi at Conestoga.
Chromebook
- Click the Wi-Fi off icon.
- Click No network.
- Click Turn Wi-Fi on or the Enable Wi-Fi icon.
- Your Chromebook will automatically look for available networks and show them to you in a list.
- Choose CCSecure from the list.
- When Prompted to Join Wi-Fi network, enter your Identity (college provided Condor ID) and Password.
- Ensure that the EAP method is set to PEAP and Phase 2 Authentication is set to MSCHAPv2
- Select CA Certificate to Default.
- Click
Connect
You should now be connected to the Wi-Fi at Conestoga.
Guest Wi-Fi Access (Eduroam)
Eduroam allows guests from other institutions to sign into Conestoga's Wi-Fi network. Using Eduroam, you can also access the Wi-Fi at numerous other campuses across Ontario, using your Conestoga College Condor ID and password.
- Open your device Wi-Fi settings, as per the above instructions.
- Choose
Eduroam.
- Enter your home institution email address (your full email address).
- Enter your home institution password
You should now be connected to the Wi-Fi at Conestoga.
Another way to connect to Eduroam with your mobile device is to scan the following QR Code:

Troubleshooting
If you have previously connected to the CCSecure network and are currently experiencing issues with the connection, please try “forgetting” the network by following these steps. Then you can re-add CCSecure as a new connection by following the directions at the top of this page.
How to forget a Wi-Fi network
Windows 11
- Click the Start menu in your taskbar.
- Open Settings and select Network & internet from the left menu.
- Choose Wi-Fi, then Manage known networks.
- Choose CCSecure and click Forget.
Windows 10
- Click the Start menu in your taskbar at the bottom left.
- Go to Settings and then Network & Internet.
- Select Wi-Fi from the left menu, then Manage known networks.
- Choose CCSecure and click Forget.
macOS
Forget a Network on macOS Ventura or later
- Choose the Apple menu > System Settings.
- Click Wi-Fi in the sidebar.
- Click Details next to the network you're using.
- Click Forget This Network, then click Remove to confirm.
Earlier versions of macOS
- Choose Apple menu > System Preferences.
- Click Network.
- Click Wi-Fi in the sidebar.
- Click Advanced to see the networks known to your Mac.
- Select the network, then click the remove button (–) beneath the list. Click Remove to confirm.
- Click OK, then click Apply.
iOS (iPhone or iPad)
- Open Settings and go to Wi-Fi.
- Tap the More Info.
- button next to CCSecure.
- Select Forget This Network and confirm by tapping Forget.
Android (phones or tablets)
- Open Settings and go to Wi-Fi.
- Tap and hold the network you want to remove.
- Select Forget network.
Need Help?
Contact the IT Service Desk, or call 519-748-5220 ext. 3444.

